Saturday, 26 January 2013
Tuesday, 15 January 2013


GNS3 Installation Hypervisor Load Balancing - 1
THIS PROCEDURE MADE UP WITHIN MULTIPLE PARTS:
1. Directory structure 2. GNS3 configurations
3. Configure Hypervisor
4. Edit Dynamips on the client
5. Edit Dynamips on the Server
6. Start Dynamips on SVR and Client
7. Start GNS3 and create simple topology
PART 1: DIRECTORY STRUCTURES
Step 1: Directory to work with… etc.
let’s create some directories in the server, remote PC and call it “GNS3”
Server: C:\GNS3 and remote pc(s): C:\GNS3
Step 2: Image directory… etc.
Server: C:\GNS3\images\ and remote pc(s): C:\GNS3\images\
Copy all the images you are planning use to both directories
Step 3: Folder for “work area” … etc.
Server: C:\GNS3\workarea\ and remote pc(s): C:\GNS3\workarea\
Step 4: Folder for router initial configurations… etc.
Server: C:\GNS3\inital_config\ and remote pc(s): C:\GNS3\inital_config\
Step 5: Folder for Dynamips work area… etc.
Server: C:\GNS3\workarea\dynamips-work-dir\ and remote pc(s): C:\GNS3\workarea\dynamips-work-dir\
Step 6: Folder for your project directory… etc.
Server: C:\GNS3\workarea\project-dir\ and remote pc(s): C:\GNS3\workarea\project-dir\
Step 7: Folder for capture directory… etc.
Server: C:\GNS3\workarea\wireshark\ and remote pc(s): C:\GNS3\workarea\wireshark\
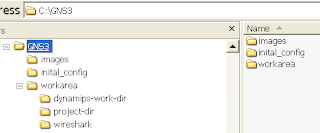
Your directory should look like this or what is best works for you…
PART 2: CONFIGURE GNS3
Step 1: Configure Preferences General… etc.
Select -- > Edit --> Preferences

Select--> General, fill out the required fields apply, OK


Step 2: Configure Preferences Dynamips; fill out the required fields, test, apply and OK.

Step 3: Configure Preferences Capture; fill out the required fields apply, OK.

Step 4: Configure hypervisor…… etc.
Select; Edit IOS images and hypervisor

Select the image file, platform, model and uncheck default image… box and leave rest default, apply, OK.

PART 3: CONFIGURE HYPERVISOR
Step 1: Configure hypervisor… etc.
Select; Edit IOS images and hypervisor and click on “External Hypervisor” tab
Host: Your remote PC, to add more host, simply follow same steps, change IP, Port, UDP and console port
Note: XP SP2 or SP3 users; either turn of your firewall or create exceptions for dynamips and ports!
Select; Start Control Panel Windows Firewall; click on Exception tab. Click on “Add Program” for dynamips and
click on “Add Port”
After filling out rest of the fields, click on “save” and click on “IOS Images” tab


1. Directory structure 2. GNS3 configurations
3. Configure Hypervisor
4. Edit Dynamips on the client
5. Edit Dynamips on the Server
6. Start Dynamips on SVR and Client
7. Start GNS3 and create simple topology
PART 1: DIRECTORY STRUCTURES
Step 1: Directory to work with… etc.
let’s create some directories in the server, remote PC and call it “GNS3”
Server: C:\GNS3 and remote pc(s): C:\GNS3
Step 2: Image directory… etc.
Server: C:\GNS3\images\ and remote pc(s): C:\GNS3\images\
Copy all the images you are planning use to both directories
Step 3: Folder for “work area” … etc.
Server: C:\GNS3\workarea\ and remote pc(s): C:\GNS3\workarea\
Step 4: Folder for router initial configurations… etc.
Server: C:\GNS3\inital_config\ and remote pc(s): C:\GNS3\inital_config\
Step 5: Folder for Dynamips work area… etc.
Server: C:\GNS3\workarea\dynamips-work-dir\ and remote pc(s): C:\GNS3\workarea\dynamips-work-dir\
Step 6: Folder for your project directory… etc.
Server: C:\GNS3\workarea\project-dir\ and remote pc(s): C:\GNS3\workarea\project-dir\
Step 7: Folder for capture directory… etc.
Server: C:\GNS3\workarea\wireshark\ and remote pc(s): C:\GNS3\workarea\wireshark\
Your directory should look like this or what is best works for you…
PART 2: CONFIGURE GNS3
Step 1: Configure Preferences General… etc.
Select -- > Edit --> Preferences

Select--> General, fill out the required fields apply, OK


Step 3: Configure Preferences Capture; fill out the required fields apply, OK.

Step 4: Configure hypervisor…… etc.
Select; Edit IOS images and hypervisor

Select the image file, platform, model and uncheck default image… box and leave rest default, apply, OK.

PART 3: CONFIGURE HYPERVISOR
Step 1: Configure hypervisor… etc.
Select; Edit IOS images and hypervisor and click on “External Hypervisor” tab
Host: Your remote PC, to add more host, simply follow same steps, change IP, Port, UDP and console port
Note: XP SP2 or SP3 users; either turn of your firewall or create exceptions for dynamips and ports!
Select; Start Control Panel Windows Firewall; click on Exception tab. Click on “Add Program” for dynamips and
click on “Add Port”
After filling out rest of the fields, click on “save” and click on “IOS Images” tab

PART 4: EDIT DYNAMIPS FILE ON THE CLIENT
Step 1: Remote or login the remote PC and Start Run type “C:\Program Files\GNS3\”
Find “dynamips-start.cmd” edit with your favorite editor;
Change line five where it says 7200 to 7220
Find “dynamips-start.cmd” edit with your favorite editor;
Change line five where it says 7200 to 7220

Recommend creating a shortcut for “dynamips-start.cmd” to on your desktop, because your going to use this quite frequently because everything
stop the router, you need to shutdown and restart it
PART 5: EDIT DYNAMIPS FILE ON SERVER


stop the router, you need to shutdown and restart it
PART 5: EDIT DYNAMIPS FILE ON SERVER
Step 1: Remote or login the remote PC and Start Run type “C:\Program Files\GNS3\”
Find “dynamips-start.cmd” edit with your favorite editor;
Change line five where it says 7200 to 7221
Change line five where it says 7200 to 7221

PART 6: START DYNAMIPS ON SERVER AND CLIENT
Server:
Step 1--> Double on dynamips shortcut on the server’s desktop;
Clients:
Step 2 --> Double on dynamips shortcut on the remote PC’s desktop

How To: Emulate Cisco ASA in GNS3
In this article, I will show you how to emulate Cisco ASA using Qemu. Once again, please note that ASA is not provided and will not be. So please don’t ask. Also be aware that ASA does not 100% work in Qemu but that’s enough to play with it.

Installation
First compile and patch Qemu as you would do for running JunOS. This will give us pcap, lcap and UDP tunnels (i.e. GNS3/Dynamips connections) capabilities.
Then obtain ASA itself. If you are smart and patient you will find it. I used asa802-k8.bin for my installations. As far as I know, nobody has been able to run ASA > version 8.2 (ASA keeps rebooting).
The next step is to get an initrd and a Linux kernel (inside the initrd) from your ASA image to use them with Qemu and also fix the initrd for our needs. The initrd is zipped and archived in the ASA image, we have to extract it.
There are 2 ways, manually or using a tool I created.
Manual methodFirst compile and patch Qemu as you would do for running JunOS. This will give us pcap, lcap and UDP tunnels (i.e. GNS3/Dynamips connections) capabilities.
Then obtain ASA itself. If you are smart and patient you will find it. I used asa802-k8.bin for my installations. As far as I know, nobody has been able to run ASA > version 8.2 (ASA keeps rebooting).
The next step is to get an initrd and a Linux kernel (inside the initrd) from your ASA image to use them with Qemu and also fix the initrd for our needs. The initrd is zipped and archived in the ASA image, we have to extract it.
There are 2 ways, manually or using a tool I created.
Create an hexadecimal dump of your image:
Search for the ZIP header:
We can see that the ZIP file starts at offset 1228b0.
Let’s find the image size:
Now we need to find out where in the file we can start extracting the ZIP part.
Extract the zipped part of the ASA image:
Decompress it with gzip:
Make a temp directory and go into it so we can extract the files contained in the uncompressed archive file (the initrd):
Now extract the archive with cpio (you must have the administrator rights to successfully extract device files).
Copy the Linux kernel to your previous directory:
Before compressing back the initrd, create the following script in asa/scripts/first_start.sh
This script formats the 256 MB flash on first start to be used by ASA. Loads the network drivers modules for Intel e100 (i82559er in Qemu) and Intel e1000 cards and activates the network interfaces to be used in ASA. I noticed that if we immediately start ASA after this first boot, it freezes (don’t really know why but it seems the system do something and slow down during the first minute …). The next time you start the system, the script will still load the activate the network interfaces and automatically start ASA.
This script formats the 256 MB flash on first start to be used by ASA. Loads the network drivers modules for Intel e100 (i82559er in Qemu) and Intel e1000 cards and activates the network interfaces to be used in ASA. I noticed that if we immediately start ASA after this first boot, it freezes (don’t really know why but it seems the system do something and slow down during the first minute …). The next time you start the system, the script will still load the activate the network interfaces and automatically start ASA.
In order for the script to be loaded at startup, edit etc/init.d/rcS and change /asa/bin/lina_monitor by /asa/scripts/first_start.sh
Change first_start.sh permissions:
Now you can compress all the file and have the initrd ready to use in Qemu:
Automated extraction method
TODO
Using ASA with Qemu
Create a FLASH (this is a virtual hard disk).
Then you can start Qemu.
TODO: networking of ASA. Very similar with JunOS emulation.
Using ASA with GNS3
To be completed:
In Preferences -> Qemu -> Qemuwrapper section:
Set the path to Qemuwrapper (can be found in the GNS3 package)
Set the working directory (e.g. /tmp).
Set the path to your patched Qemu in “Path to Qemu”
In ASA section:
Set the paths to your initrd and kernel.
Drag and Drop an ASA symbol on the scene, start the firewall and telnet to it.
How To: Use MRTG with GNS3
What is MRTG?
- MRTG is opensource program which gets traffic statistics from devices using SNMP and builds graphs like this:

Installing MRTG
- Download MRTG from http://oss.oetiker.ch/mrtg/ and follow installing instructions to install MRTG
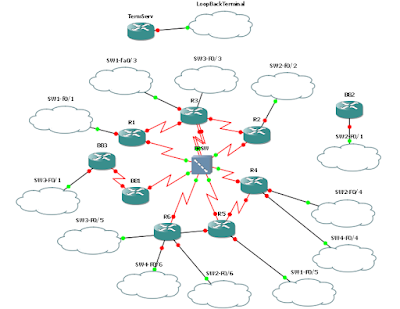
Setup virtual topology
 Install Ms loopback adapter to your Windows machine and configured IP-address 10.10.10.1/24 for it.
- Configure router:
hostname R0!interface FastEthernet1/0ip address 10.10.10.2 255.255.255.0duplex autospeed auto!!!snmp-server community mycommunity RO
Verify that ping goes from your local computer to emulated router R0
Configure and run MRTG
- Follow MRTG guide: http://oss.oetiker.ch/mrtg/doc/mrtg-nt-guide.en.html
- After you have configured MRTG with command:
perl cfgmaker mycommunity@10.10.10.2 –global “WorkDir: c:\www\mrtg” –output mrtg.cfg
- Run MRTG with command:
perl mrtg mrtg.cfg
Every time when you run MRTG it will get data from the router and save it. You can run MRTG manually every 5 minutes or configure this to happen automatically. To do this follow MRTGinstructions. When you have done this MRTG starts to build graph for you.
Subscribe to:
Posts (Atom)