Last night I have successfully run GNS3 on Windows 8 (64 bit). Using and configuring GNS3 on Windows 8 64bit is really simple. You need to perform the following steps for installation:

 Once you have done above steps, GNS3 is ready for creating and simulating different labs. I have tested some simple Gns3 labs on Windows 8 and GNS3 works fine for me. Please share your experience of using GNS3 on Windows 8.

· Download “GNS3-0.8.3.1-Standalone-64-bit” from GNS3 official website www.gns3.net/download/ for your Windows 8 64bit edition.
· This download file is a zip folder you can easy extract this by “winrar” to any location on your PC.
· Open the extracted folder and click on GNS3.exe to start using the GNS3.
GNS3 Configuration on Windows 8:
You need the same GNS3 configuration steps that you need on Windows 7 or other earlier versions of Microsoft.
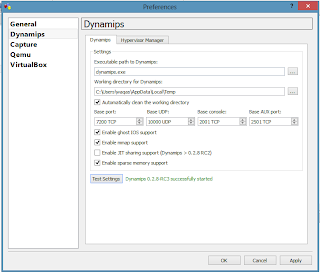
1. Open Dynamips setting from edit\preferences and from preferences menu select dynamips-tap and click on test settings and after few seconds it will show the message that “Dynamips 0.2.8-RC3 successfully started ”

You may get error of dynamips “failed to determine version of Dynamips” for solution you can following the link.
2. For using Gns3 on Windows 8 and you also need some define some IOS for Routers, you can set the IOS in gns3 from IOS and hypervisors console. You can find this menu from “edit\ IOS and hypervisors console” and define IOS for GNS3 by browsing IOS file.


No comments:
Post a Comment